How to Set-Up Dual Monitors
Working with multiple screens offers numerous benefits to both your working life, and any PC-based hobbies you may have. These days, having just one screen to work on in any office space is uncommon. Some desk spaces can boast 3 or even 4 screens to work from!
Dual monitor setup is perhaps the most common though, offering two extra monitors alongside your usual PC/laptop display. In this blog we will discuss the benefits of dual monitor configurations, the different options involved and how to set them up on both Windows and Mac devices.

Benefits of the Dual Monitor Set-up
Setting up the Hardware and Devices
So, you have your brand-new flashy monitors and you’re ready to go. Good job! First off though, it is important to note that not all laptop computers will support dual monitor set up. This will depend on your laptop’s graphics card and motherboard – so make sure to check this out first! The same goes for tower PCs too. Some Mac devices may require an additional adapter too.
It’s also important to note that not all laptops/computers will feature two video outputs. Some may offer a HDMI and a VGA output together, meaning you can connect one monitor via a HDMI cable and the other monitor via a VGA cable.
If your device does only contain one video output, then you may require what is known as a docking station. This is a little box that sits on your desk, which can split your one video output into two – meaning you can have dual monitors running.
Dual Monitors on Microsoft Windows
Once you’re all wired in, you’ll need to access your display settings. The easiest way to do this is to right click on the desktop and select ‘Display settings.’ Scroll to the bottom and you will see the heading ‘Multiple displays’ and the option to either extend or duplicate your display.
Change the size of text, resolution and page orientation to suit your preferences as usual. Then here comes the slightly tricky part!

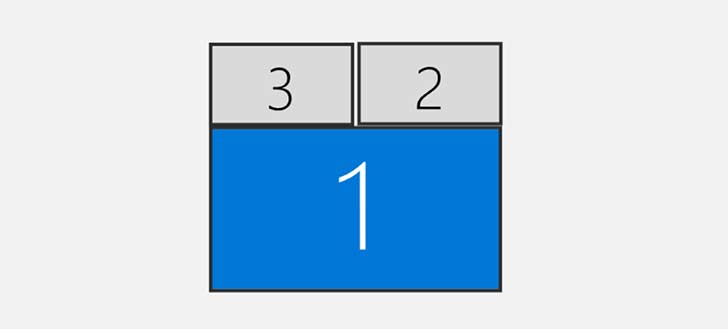
This screen allows you to position your displays the way you want them. You can click and drag the screens around to the configuration you want.
The most important factor here is how you would like your mouse/pointer to travel across the screens. For example, this could be side-to-side in a straight line or with the two extra monitors above the main display as you see in the example.
Dual Monitors on Apple Mac
Checking how many displays your Mac supports is easy. Click the Apple menu and select ‘About This Mac’ and then click ‘Support.’ Under the ‘Specifications’ tab (under Video Support) you can find out how many displays your Mac supports.
If you’re all good to go with two monitors – click ‘System Preferences’ from the Apple menu and then select ‘Displays.’ Select the ‘Arrangements’ tab and from there it is a similar process to Windows. You can either extend or mirror your display.
Arrange your displays to match the setup on your desk using the drag-and-move function, allowing you to move one of the displays where you want it.

A red border appears around the display you are arranging. Drag the white bar to another display to change the primary screen.
Need a Hand? Give us a Call!
All of this may sound complicated, but it’s actually really easy. It’s just a case of knowing what your devices are capable of and finding the right connections to fit. Feel free to give us a call if you need some assistance with your hardware and wiring – or if the drag-and-move screen options are causing you frustration and lost productivity!


